

Mar 25, 2024 — EventLink
The Definitive Guide to Wizards EventLink
Everything you need to know about Wizards EventLink—what it is, what it does, and how to use it.
Mar 25, 2024 — EventLink
The Definitive Guide to Wizards EventLink
Everything you need to know about Wizards EventLink—what it is, what it does, and how to use it.
Here's everything you need to know about Wizards EventLink—what it is, what it does, and how to use it. Let's get started!
Wizards EventLink is the Wizards Play Network's event management tool—and it makes scheduling, reporting, and running events easier than ever before.
What makes Wizards EventLink so awesome? We're glad you asked.
Simply put, EventLink is the best Magic event reporting tool we've ever made.
Here's what you can do with EventLink:
Access from any device with a browser.
"The ability to access it from any type of device that can access the internet is great. Now our staff can take results on their smart phones and tablets without being locked into sitting at one computer all night." — Greg Peck, Greg's Games
- Use EventLink from your computer, phone, tablet—wherever!
- New features and improvements added every two weeks
- Save your tournament info across devices
- Run multiple events at once on multiple devices
- Multiple Tournament Organizers can log in at once
Report automatically.
- Save time by skipping event reporting
- Avoid upload errors
- Just end the event—you're done with reporting!
Add staff yourself.
- Choose different permission levels for your staff
- Scorekeepers—run events only
- Admin—do almost anything that EventLink permits!
Run Magic Arena events.
- Use an Event Template to set up an Arena event
- Take admission fees for Arena events!
- Players will Direct Challenge each other in Arena
- Results will be automatically reported
Integrate with Magic Companion.
- Players enter an Event Code from their phones and are in!
- Players report their results from their phones
- Pairings automatically send to player's phones
What is Magic Companion?
The Magic: The Gathering Companion App is a phone app that players download to enter events, report results, check pairings, and more.
Your players can download the Companion for iOS or Companion for Android right from the App Store or Google Play.
Companion doesn't just make life easier for players—it makes running and reporting an event quicker and simpler on your end by taking the detailed work of recording results and creating pairings off your Tournament Organizers' shoulders.
Wizards EventLink User Guide
Below you will find the complete guide to all the features and functionality of Wizards EventLink. To navigate to a specific section, click one of the following topics:
- Signing In
- Creating an Event
- Duplicating Events
- Running an Event
- Registering Players
- Invite List Import
- Removing Registered Players
- Late Registration
- Manual Pairing
- Table Locking
- Starting Table Number
- EventLink Mirror
- Event Phases
- Drafting Phase (Booster Draft)
- Deck Construction (Sealed)
- Rounds
- Timer
- Pairings
- Reporting Results
- Adding Penalties
- Deleting Round Results
- Playoffs
- Ending the Event
- Standings
- Adding Staff
- Submitting Feedback
Signing in
You can access Wizards EventLink from any computer or mobile device with an internet browser.
- Head to Wizards EventLink
- Log in using your Wizards Account credentials.
- If you have multiple stores, select the location you would like to schedule or run events for from the dropdown.
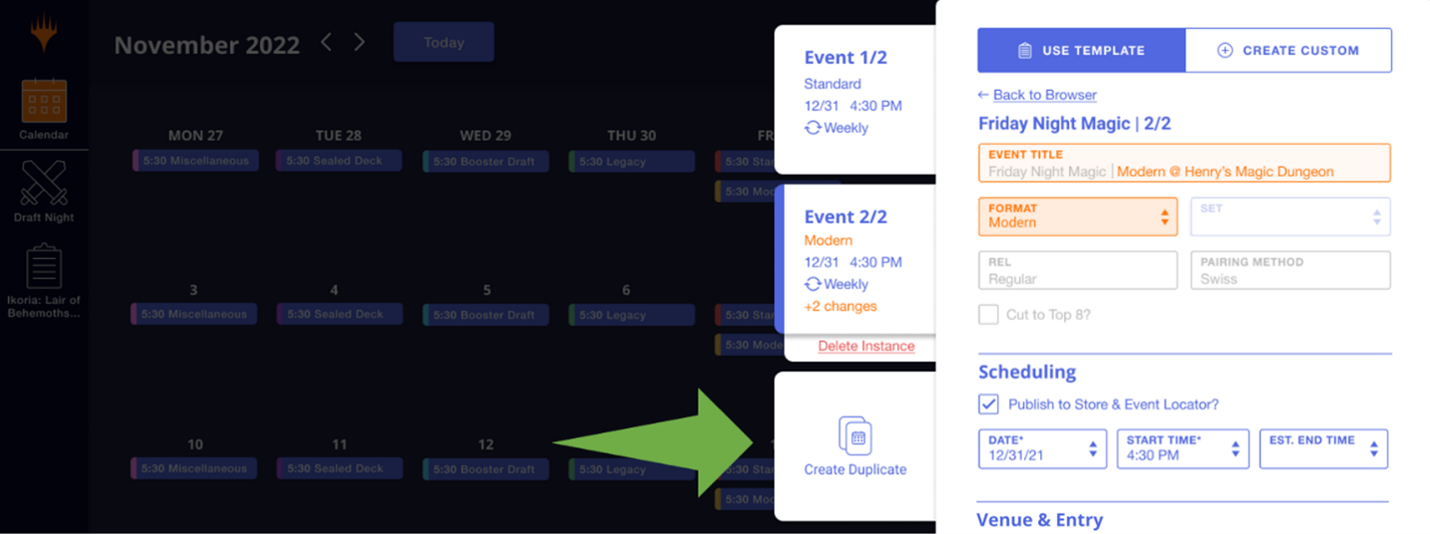
Creating an Event
The Calendar view on Wizards EventLink serves as your homepage, where you can view past and future months, open events, and schedule new events. Creating an event is straightforward and only takes a few clicks. Here's what you need to do:
- Click on the day you want to schedule your event, or the "Create New Event" from the calendar screen.
- Select "Use Template" when scheduling WPN program events such as Prerelease or Friday Night Magic. Select "Create Custom" for non-program events or to report casual in-store play.
- You can now input the parameters of your event, many of which will appear on the event’s listing in the Store and Event Locator.
- Title — The name of your event. Consider giving your event a descriptive name that avoids jargon and abbreviations, such as "First Monday Modern," "Weekly Chaos Draft," or "Casual Commander Open Play." Templated program events will always include the name of the program.
- Format — The play format for the event.
- REL (Rules Enforcement Level) — You can read about the different Rules Enforcement Levels in section 1.12 of the Magic Tournament Rules.
- Pairing Method — Determines how matches will be paired.
- Swiss is the most common pairing method as it allows players to participate in all rounds before playoffs.
- Single elimination eliminates players from the event when they lose a match.
- Player List Only events do not generate pairings or record match results. Use this setting to record Commander events or casual play occurring at your store. Player List Only events count towards your play metrics equivalently to structured events.
- Cut to Top 8 — Check this box if you plan to go into playoffs after Swiss rounds are complete.
- Two-Headed Giant — Check this box if you plan to run the event using the Two-Headed Giant format.
- Publish to Store & Event Locator — This setting is enabled by default, which makes your event visible on the Store and Event Locator. Uncheck this for spontaneous events or to report casual play.
- Entry Fee & Currency — List the cost of entry for your event as a whole number, as the system cannot intake decimals. If you leave this at 0, it will not be listed on the Store and Event Locator.
- Is Online — Checking this will indicate that the event will be played via SpellTable beta as opposed to in-store.
- Date — The date of the event.
- Start Time — This will allow you to display a start time in EventLink on Locator but will not restrict you from running the event at a different time.
- Estimated End Time — Give an indication of when you expect the event to begin and end.
- Frequency — This allows you to schedule a series of non-templated events on a daily, weekly, or monthly basis.
- Venue — Choose the location of your event, including approved off-site locations. You can request approval for off-site locations from the "Store Settings" page.
- Description — Your event description will appear under the event’s listing on the Store and Event Locator. You can provide additional details here such as prize structure or any special rules for the event.
- Once all event parameters are filled in, click "Create Event" and your event will now be available to open and run from the calendar.
Duplicating Events
When scheduling program events you can click "Create Duplicate" to create another event using similar parameters to what you currently have input. You can make adjustments to individual instances of each event as needed.
Running an Event
Find your event using either the "Month" or "Agenda" view, toggleable from the top right of the screen.
.png)
From either view, click on the event then "Open Event."
.png)
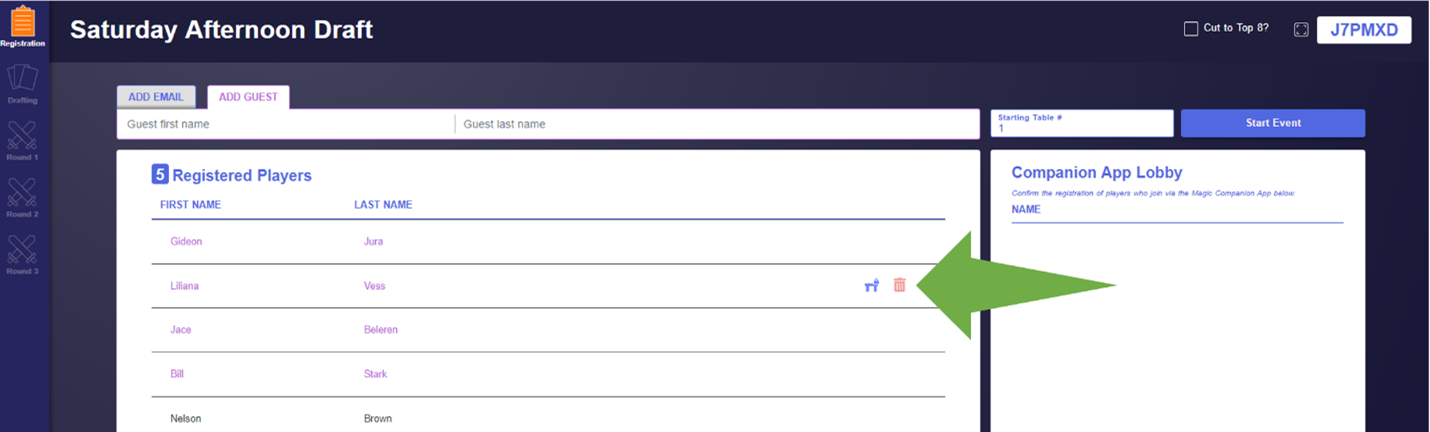
Registering Players
There are three ways to register players in your events:
Companion Registration
Having players use Magic Companion to register offers the most efficient and user-friendly experience.
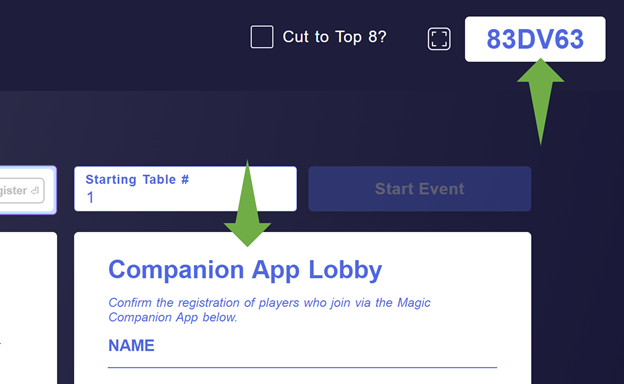
- Provide event participants with the Event Code, which can be found near the top right of the screen. You can use the EventLink Mirror to display the event code in a separate tab.
- Players sign into Magic Companion on their mobile device, tap "Join" and then input the Event Code. The player will now appear in the Companion App Lobby on the registration page in EventLink.
- Select the player from the list and press enter to add them to the event. You can use the CTRL key to select more than one player at a time and enter them simultaneously.
Wizards Account Registration
For players that do not have Magic Companion, you can register them by entering their Wizards Account email address under "Add Email" and pressing enter. If they do not have a Wizards Account, they can create one at https://myaccounts.wizards.com/.
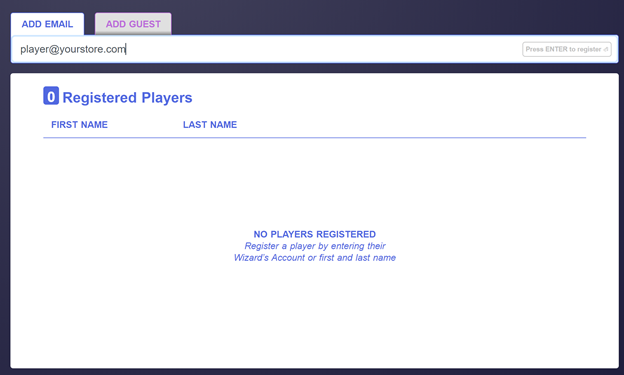
Guest Account Registration
For players that are unable to create a Wizards Account in time for your event, they can be registered using a Guest Account. Click "Add Guest" then enter their first and last name, and press enter.
Guest Account entries will only ever be connected to a single event, and their first and last name will be deleted after 24 hours. Guest entries will count towards your Tickets and future Prerelease allocations but will not count towards Engaged Players.
Invite List Import
You may also upload an invite list to populate the registrants of your event! When creating your event, all you need to do is upload a .CSV file with either a player's Wizards Account email or a general display name in the first column.
You may use a spreadsheet with additional values in other columns, but EventLink will only read what's in Column A. EventLink will not be able to accept entries that are duplicated, or emails that are not tied to a Wizards Account—if either of these situations occur, you'll receive an error message that tells you which error you encountered to improve troubleshooting.
You will still be able to add or remove players manually, so if you need to make changes once you import a list, you can still do so.
Removing Registered Players
You can remove registered players before beginning the event by mousing over their name in the list and clicking the trash can.
Late Registration
You can register players late for all formats except Booster Draft by returning to the registration tab. Late players will by default be given a match loss for each round they missed; however, you have the option to edit the pairings of the round in which they entered the event at your discretion.
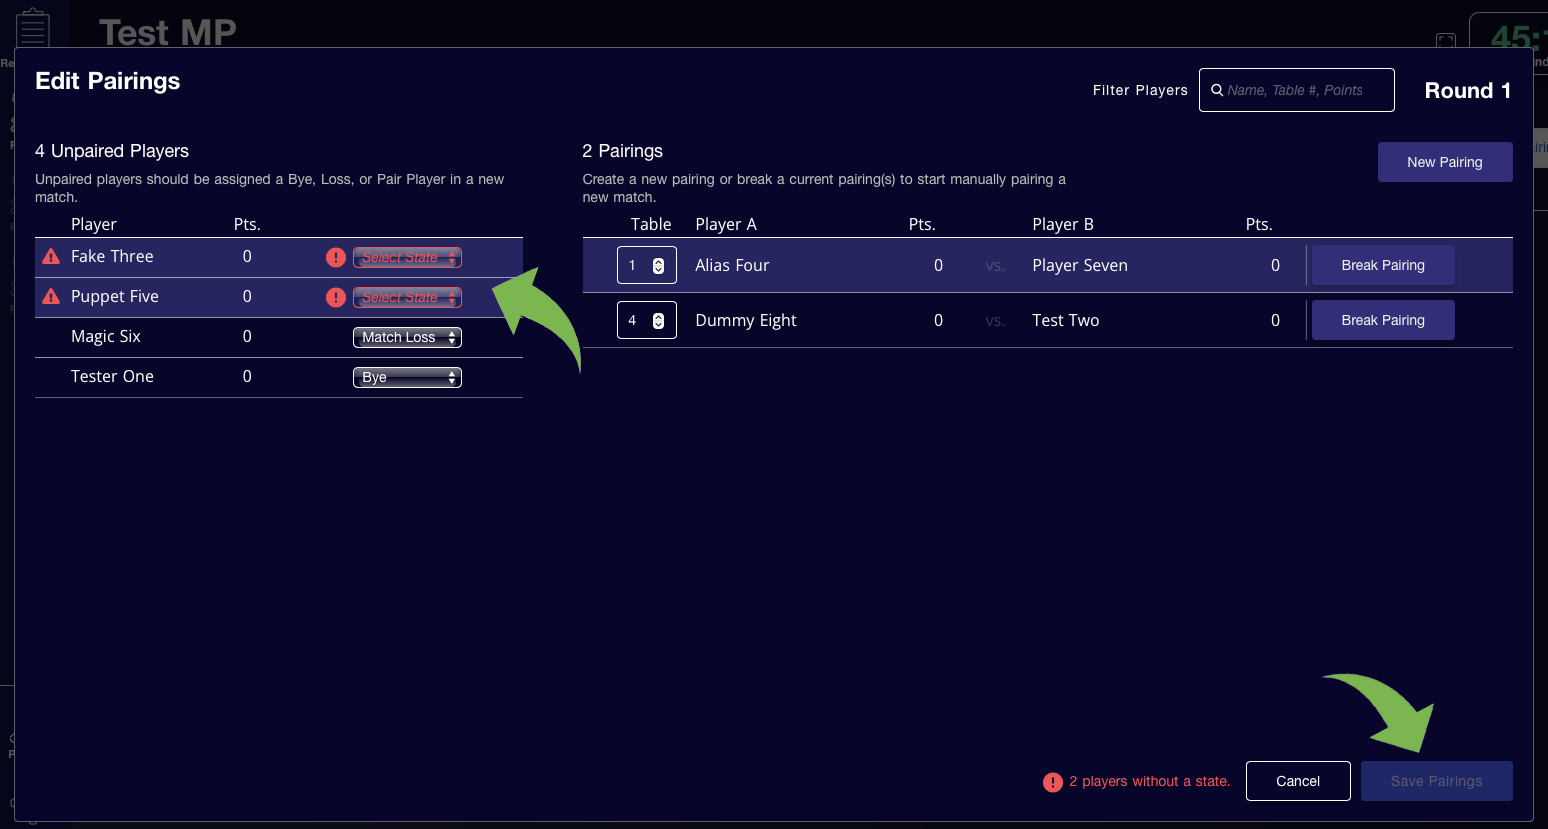
Manual Pairing
Manual Pairing is a Wizards EventLink feature designed to allow for correction of errors throughout an event. With this feature, Tournament Organizers can edit the results of the previous round and manually change the pairings of the active round of an event.
Manual Pairing may be used at the organizers discretion in Casual REL tournaments (meaning tournaments not following the Magic Tournament Rules), such as pairing younger players together or ensuring friends don't have to play against one another.
Manual Pairings may be used in Regular, Competitive, and Professional REL events only to correct mistakes made by the organizer during the event, such as fixing past round results or repairing players that they incorrectly instructed to play one another.
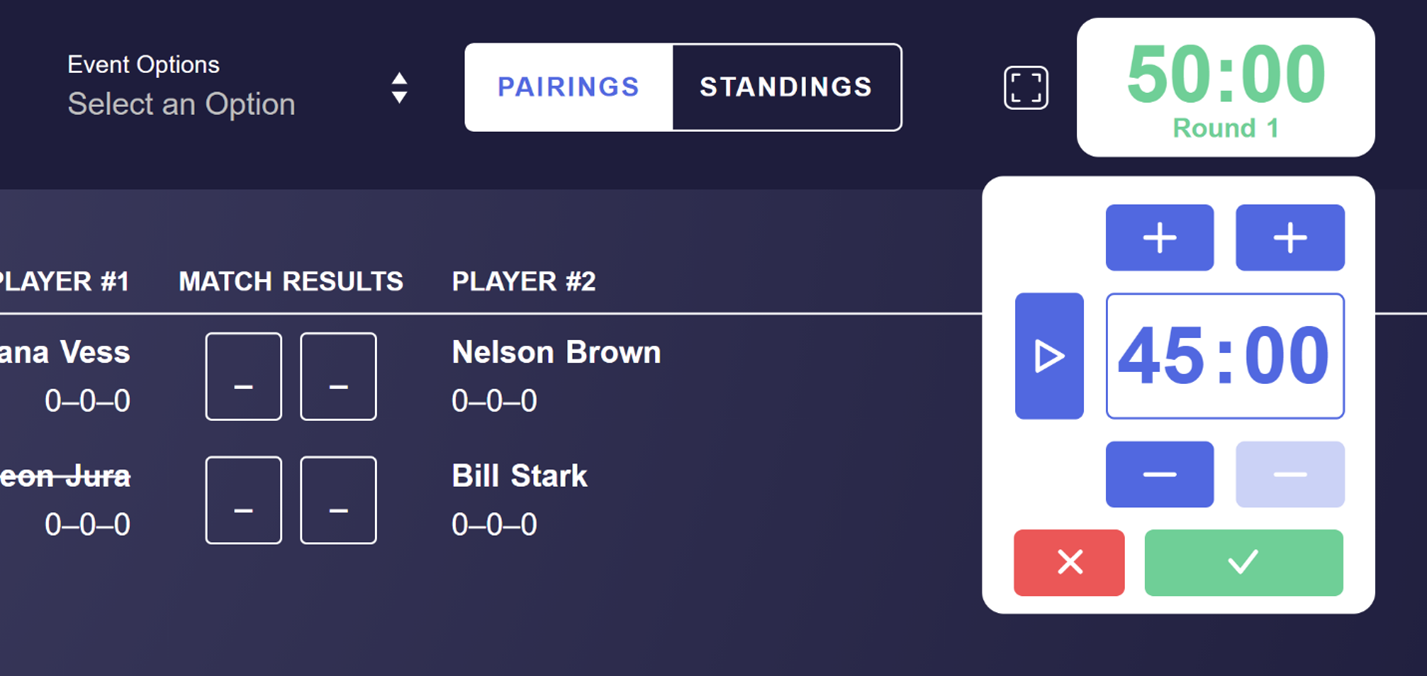
When running an event in the active round, users will see a new “[Edit] Pairings” button in the upper-right corner of the active Round screen. Selecting this button allows users to edit the pairings of the current round.
![A screenshot of a test EventLink store showing a Round, with the [Edit] Pairings button visible in the top right corner under the timer](https://media.wizards.com/2024/wpn/w13/image-20240216-221256.png)
Users will see all paired players as well as unpaired players (i.e. a player with a bye). They have the option to break any of the current pairings, which puts affected players in an unpaired state.
In order to proceed, players must receive one of the three states available in the drop-down:
- Bye
- Match Loss
- Pair Player
Selecting this option requires another player to be paired with them to proceed.
Once a valid state has been applied to all players, and once all pairings have an assigned table, the user can then save the pairings.
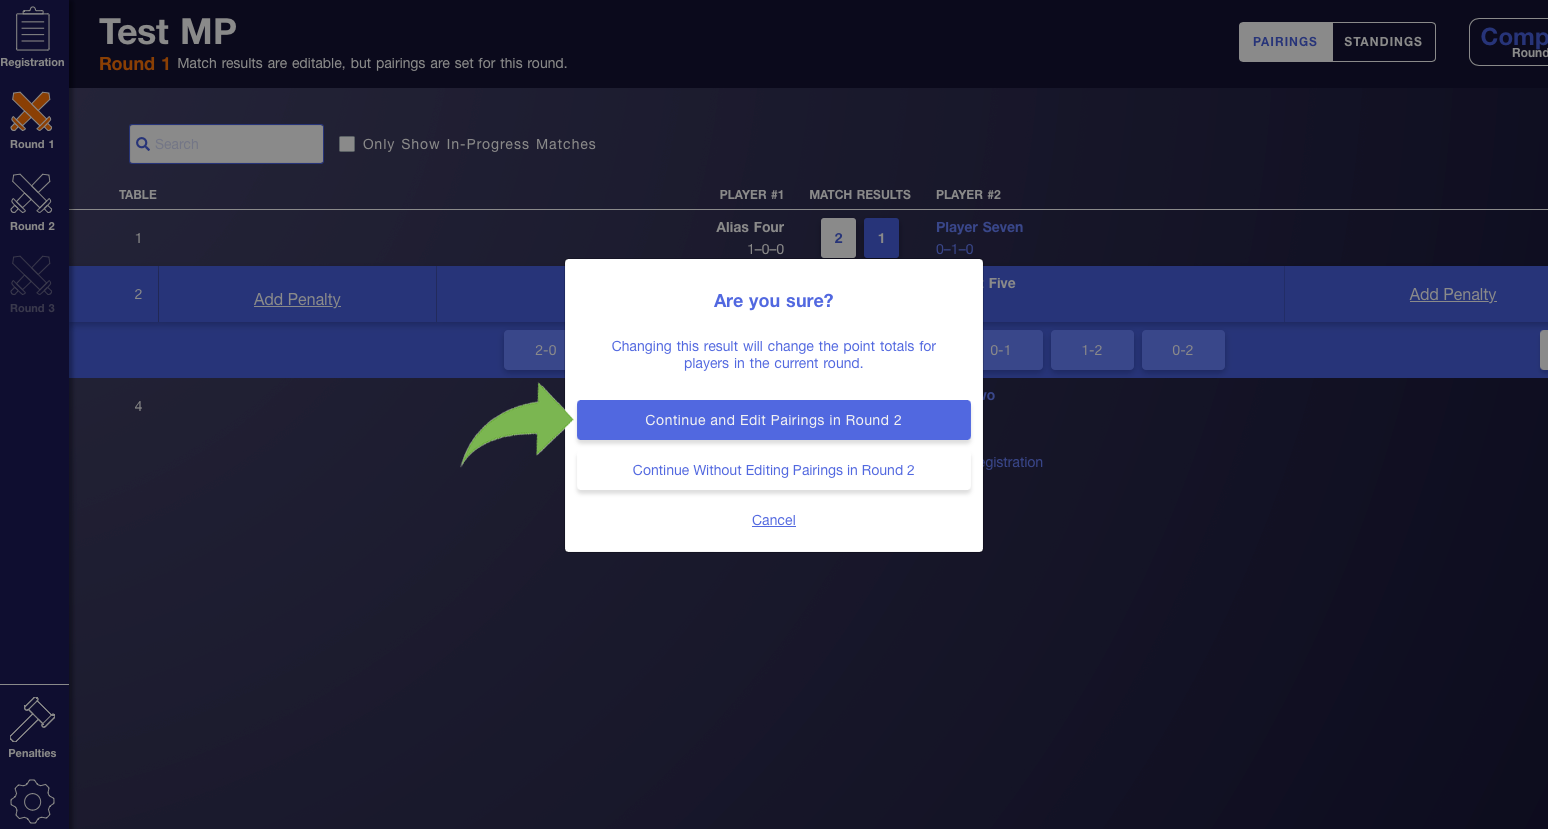
After completion of the first round, subsequent rounds will have an additional button available next to the “[Edit] Pairings” button: “[Edit] Scores Round X” with X referring to the previous round. When selected, the user is taken to the previous round’s Pairings screen and can edit that round’s scores.
- Note that the EventLink user may also return to the Pairings tab of the previous round and edit scores that way.
- Round screens state what actions are available in that round in the upper-left corner underneath the event title and next to the round number.
- “Continue and Edit Pairings in Round X” where X refers to the active round.
- Selecting this option will then save the updated score and take the user to the “Edit Pairings” screen for the active round.
- “Continue without Editing Pairings in Round X” where X refers to the active round.
- Selecting this option will then save the updated score and return the user to the Pairings tab of the active round.
- Note that users may still choose to edit the pairings of the active round via the “[Edit] Pairings” button.
- “Cancel”
- Cancels the score change and keeps the user on the previous round's Pairings tab.
It is worth noting that this feature currently does not allow for manually editing draft pods; it is currently designed to edit scores and pairings once round play has begun.
Table Locking
If you have players with limited mobility or parents that wish to sit near their child for an event, you can lock a player to a specific table by mousing over their name in the list and clicking the table lock symbol. Players locked to a table will always be assigned that table. If two players with locked tables are paired together, they will be assigned to the lower table number of the two.

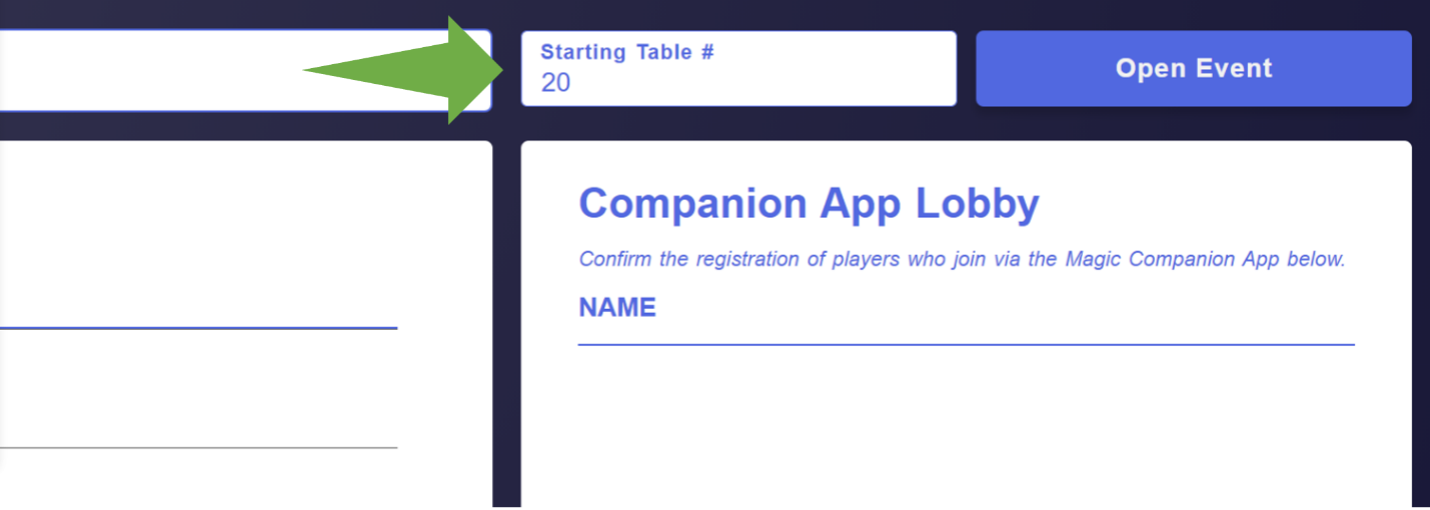
Starting Table Number
Setting a Starting Table Number will ensure that table assignments begin at that number for this event. Using this feature will allow you designate which section of your play space is used for each event while running multiple events simultaneously.
For example, if you had two events running at the same time, you could set the Starting Table Number to 20 for your second event to ensure that table assignments in that event start at table #20, leaving tables 1-19 free for your first event.
EventLink Mirror
EventLink Mirror allows you to display event information to your players on a secondary monitor in your play space. Click the EventLink Mirror symbol to open a new tab that will display relevant information for the current phase of the event such the event name, event code, pairings, standings, and round timer.
.png)
.png)
Event Phases
Drafting Phase (Booster Draft)
For Booster Draft events, the first round will be preceded by the Drafting phase. Once all players are seated in their pods, click Start Draft Timer. Once the draft is complete, you can click on the timer to restart it for deckbuilding.
From the top right you can select "In-Pod" if you want players to only be paired with other drafters from their pod. "Cross-Pod" will allow players to be paired with players outside their draft pod.
Once the draft and deckbuilding are complete, click "Create Round 1."
.png)
Deck Construction (Sealed)
For Sealed events, the first round will be preceded by the Deckbuilding phase. Once players are all seated for deckbuilding, click "Start Deckbuilding Timer." Once players have completed their decks, click "Create Round 1."
Rounds
EventLink will automatically generate a number of rounds based on how many players are in the event, but you are free to run as many rounds as you’d like.
To end an event early, click "End Event" near the bottom left of the screen.

You can add additional rounds by clicking "Add Round" at the end of the final pre-generated round.
Timer
The timer is set to 50 minutes by default, but you can adjust the duration by clicking on it.
You can find recommended round time limits in Appendix B of the Magic Tournament Rules.
Pairings
Each round, players will receive pairings and table assignments via Magic Companion.
You can also display this information using EventLink Mirror or by printing them from the "Event Settings" dropdown near the top of the screen.

Reporting Results
Players can submit round results directly from Magic Companion or the tournament organizer can manually input them into EventLink from the pairings screen.
Only one player needs to submit the results of a match, but both players will be sent a notification confirming the submitted result in Magic Companion. If a correction needs to be made, the player can notify the tournament organizer to make the correction in EventLink.
Once all results have been submitted, click "Create Next Round."
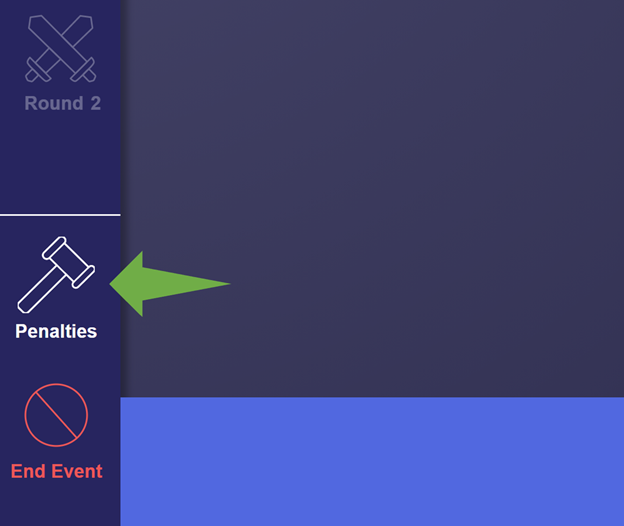
Adding Penalties
You can apply penalties by clicking "Add Penalty" from the pairings screen. You can view previously added penalties you have input during the event from the "Penalties" tab:
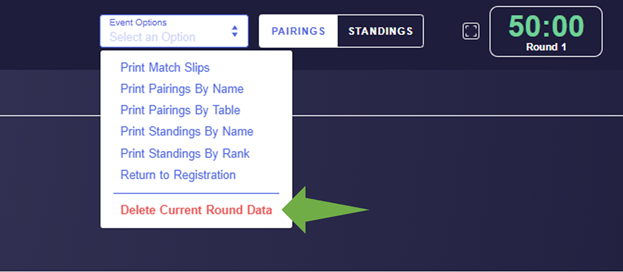
Deleting Round Results
If you need to correct a result from the previous round after pairings have been generated, you can select "Delete Current Round Data" from the Event Options Dropdown, correct the result, and re-pair. You can only go back one round at any given time. Please refer to the “Manual Pairing” section of our guide to see if you are able to make sufficient edits to the previous and current round before deleting a round.
Playoffs
If you selected "Cut to Top 8" when scheduling your event, the final Swiss round will be followed by three rounds of single elimination playoffs.
Ending the Event
Once the final round is complete, you can click "End Event" and the results will be automatically reported.
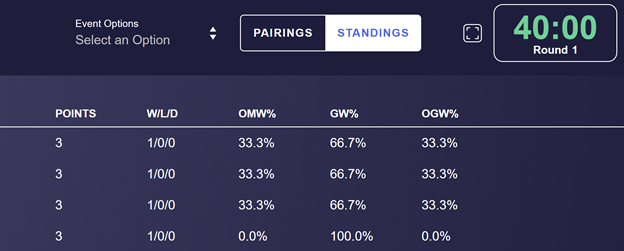
Standings
At any time throughout the event you can view or display Standings from the top right of the screen. Players can also view standings from the Companion App.
Adding Staff
With EventLink, store owners and admins can add tournament organizers to the store’s account without contacting Retail Support. The new staff member will need a registered Wizards Account to be added.
.png)
- Under "Staff Permissions," enter the email address registered to the staff member’s Wizards Account.
- Select one of the two roles:
- Store Admins can schedule events, run events, and add additional staff members.
- Scorekeepers can run events, but not add additional staff members.
- Press "Enter"
.png)
.png)
The added staff member can now log in to your store’s EventLink profile using their Wizards Account credentials. Each staff member should only ever use their own account credentials to log in and use EventLink.
Submitting Feedback
You can submit feedback and bug reports to the EventLink team by clicking "Submit Feedback" in the bottom left.
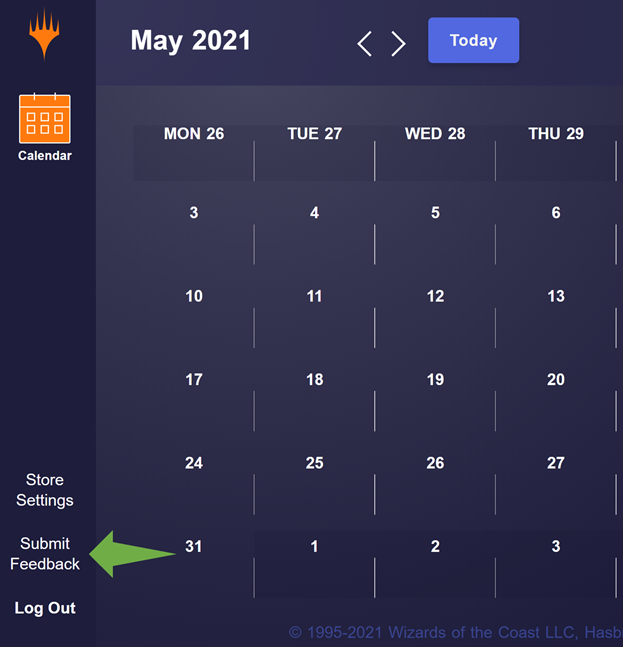
We're incredibly grateful to WPN retailers like you for taking the time to share your feedback, so keep those comments coming! You can send feedback directly through EventLink—the team reads every single piece.
And that’s everything you need to know to schedule and run events in Wizards EventLink! If you have additional questions not covered in the guide, please reach out to Retail Support for assistance.
WPN Premium

Level Up Your WPN Membership
Learn MoreNot a Member Yet?

Apply to Join the Wizards Play Network Today
Visit our support site, select your region, and submit a request to apply.
We use necessary cookies to allow our site to function correctly and collect anonymous session data. Necessary cookies can be opted out through your browser settings. We also use optional cookies to personalize content and ads, provide social media features and analyze web traffic. By clicking “OK, I agree,” you consent to optional cookies. (Learn more about cookies)